
Advanced Fridrich method (CFOP) 3x3

This guide takes you through every step of the CFOP speedcubing method. The name CFOP comes from the steps involved (Cross, F2L, OLL, PLL), and you may also see it referred to as the Fridrich method (after Jessica Fridrich, who helped turn it into the most popular speedcubing technique). Learning and practising this method can take you all the way to the top of the game - it is used by a lot of the top speedcubers to set world records, including the current staggeringly low time of 4.9 seconds.
Full CFOP takes some dedication. If you've just arrived at this website looking to learn how to solve a Rubik's Cube and thought to yourself "Beginner my left foot, I'm starting with the speedcubing guide, that sounds fast", then I warn you now: here be dragons. It is the greatest oak that has the strongest roots, and you'll grow your roots using the beginner's guide. Go on, I'll wait right here.
Are you back? Good. Now that you know the beginner method, you can begin to introduce the concepts in this guide into your solves. You needn't go through the steps in order - you can learn and practise each bit independently, falling back on the beginner method as and when you need it.
Let's jump in!
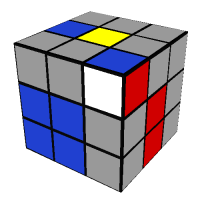
Step 1 - The Cross
This step is the same as the beginner method - forming a cross on the first layer to get this: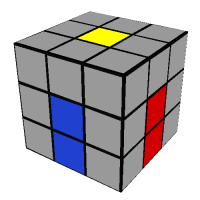
But not exactly the same, as you'll have noticed - the cube is upside down. Indeed, the whole cross is assembled on the bottom layer instead of the top. This will be awkward the first few times you attempt it, but it is certainly worth practising. Not having to turn the cube over after completing the cross on the top layer saves a lot of time, and it also means that you can be looking for the pieces for the next step whilst completing the cross on the bottom.
At this stage, a lot of people still find it quite difficult to intuitively manipulate the cube. This means that doing the cross on the bottom is difficult, as they have come to rely on algorithms for situations that are suddenly upside-down. It is difficult to teach intuition, but through practice it should eventually just 'click' in your head. If doing the cross on the bottom takes much longer than when doing it on the top, don't be disheartened! It does take time to get used to, and it doesn't really matter how long you take when you're practising.
As mentioned above, the sections in this method don't have to be learned sequentially. Move on to the next sections, but keep starting with the cross on the bottom. I have found that the next step (F2L) is a huge help for people to understand how to move cubies to where they want them, a skill that they can later when returning to the cross.
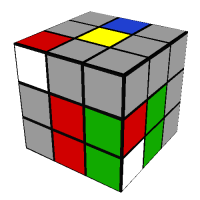
Step 2 - F2L
The next step is to solve the rest of the first two layers (which is what F2L stands for) at the same
time, to get this:
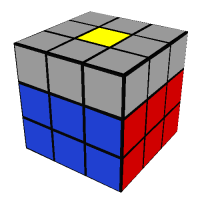
The idea of F2L is to pair each of the four bottom layer corners with the corresponding edge piece and then insert them into the correct place. Here's a simple example:
R U R'
The corner piece is paired with the edge piece, and the pair is inserted into the right place. Easy peasy. There are, however, a few situations you might find yourself in where this procedure is not quite so obvious. Here's a similar example:
(R U2 R') (U R U' R')
This can't be solved as simply, but the idea is exactly the same. The two sections of the algorithm show the two steps in the same procedure as before - the first bracketed section shows the pairing of the two cubies, and the second section shows the pair being inserted correctly. You simply repeat these steps for each of the four corners, and solve each F2L pair in turn.
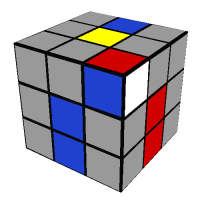
The important part of F2L is being able to solve each of the pairs without affecting any of the other previously solved pairs. For example, here are two ways of pairing the corner and edge pieces:
F U2 F'
U' R U2 R'
The first algorithm does successfully pair the red-blue corner and edge pieces, but it also lifts out the blue-orange pair from its proper place, thereby undoing any hard work it took to put it there. Instead, a simple U' before the algorithm means that when you then pair the red-blue corner and edge piece, you avoid affecting the blue-orange pair. Instead, the pieces that do get affected are ones you don't care about, as they were occupying the space that you want to put the red-blue pair into.
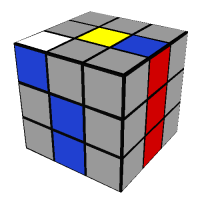
This idea of finding an empty space on the cube and using it to build a corner-edge pair is crucial to F2L, as of course you want to be able to construct each of the four F2L pairs without disturbing any previously solved ones. But sometimes it can be advantageous to disturb unsolved spaces by choosing a space to build your corner-edge pair that also assists the creation of the next pair. For example:
U' F U F' U
F' U F
In this situation, the first algorithm uses the empty space between the red and blue faces to move the red-blue edge piece so it can be easily paired and inserted. This doesn't disturb any of the other F2L spaces, but you can see that the red-green pieces are looking rather unsolved and unhappy. If you used the second algorithm instead, then the same thing happens to red-blue corner and edge pieces, but now the red-green pieces are much happier and are in a position to be solved much more easily.
You now know the basic ideas of F2L. Have a go on your cube, and see if you can work out how to solve any of the pairs. Rather than relying on a big table of algorithms, F2L is best done intuitively. This is for the same reason as the cross in step 1 - you need to be able to look at the cube and produce an efficient way of solving each F2L pair. Just like with the happy red-green pieces before, sometimes you will come to an F2L situation that you've solved many times, but solve it in a different way because you want to set up the next F2L pair for easy solving.
However, there is such a list on the algorithms page, where you can see each F2L case and how to solve it. They are there so you can see an optimal way to solve each case, but try to not rely on them for every single F2L case you encounter. Instead, really try and solve each case intuitively.
Step 3 - OLL, PLL
Now, when you're solving the cube using the full CFOP method, the whole last layer is supposed to be solved in two steps:OLL, or Orientation of the Last Layer
PLL, or Permutation of the Last Layer
These steps are solved using only one algorithm each. So the first algorithm orients all the last layer pieces (makes them all face the right way, i.e. with yellow on top) and the second permutes them (puts them all in the right places). 'Orientation' always refers to the way a cubie is rotated, and 'permutation' always refers to where it is on the cube. As you might well imagine, this means that full CFOP has a lot of algorithms in it - one for every situation you might encounter.
And that's it! You solved a Rubik's Cube using the CFOP method!
Congratulations!
Congratulations!


![Solve Rubik's Cube 3x3 bigginer method [easy]](https://blogger.googleusercontent.com/img/proxy/AVvXsEiQR3yswmS5tMV7oV1Zfv4XHfDZe9trdEaf0mB5L4ikO8y4qybJTSjsGNUiUrBcjUbVly4ZRqIUTrhjM5K4mRcuCaOKnRsOxHGQAjci3z3TP5ho_o2viGrJaOU1wDffh9QSOQecEuIFCanMQGjLwuhdVvrQNC2aqrjwWJF2_ujAPw=s72-c-d)

Leave a Comment