
Solve Rubik's Cube 3x3 bigginer method [easy]
If you are new to rubiks cube first read Basic Concepts of the Rubik's Cube

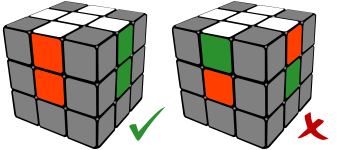
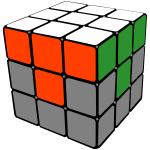
We already know that the center pieces are fixed and they define the color of each face. This is why we have to solve the white edge pieces paying attention to the middle sides.
Solving the white edges is intuitive and quite easy because there are not so many solved pieces you have to pay attention to. In most cases you just simply rotate the piece where it is supposed to be.
Here are a few examples which require a few extra moves.
F R' D' R F2 F' R' D' R F2 R' D' R F2
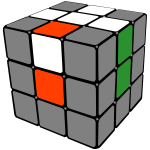
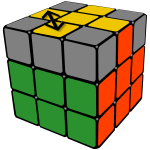
Our cube should look like this when we complete this step.
If you have difficulties solving the white corners, here's an easy trick you can always apply, you just have to memorize a short algorithm and repeat it until the piece is solved:
Bring the corner below the spot where it belongs (Front-Right-Up corner) and repeat the algorithm above until the white corner pops into place oriented correctly. This algorithm sends the piece back and forth between the spots marked with dark, always changing the orientation.
trick always works but requires too many unnecessary steps. Here are the shorter algorithms:
F D F' R' D2 R D R' D' R
RIGHT LEFT
U R U' R' U' F' U F U' L' U L U F U' F'
When there's no edge piece to insert into the middle layer you will have to execute the algorithm twice to pop the piece out in the first step.
U R U' R' U' F' U F - U2 - U R U' R' U' F' U F
In this step, when all other edge pieces are solved, except the yellow ones you can have these patterns on the top of your cube. Use the algorithm to transform to the next state until you reach the cross.
To sort this out we use an algorithm which swaps the Front-Up and the Left-Up adjacent edges.

SHARE THIS AMONG YOUR FRIENDS !
1. SOLVE THE WHITE EDGES
We start by solving the white edge pieces. Of course you can start with any other color but in this solution guide we're going to use the white for a reference.We already know that the center pieces are fixed and they define the color of each face. This is why we have to solve the white edge pieces paying attention to the middle sides.
Solving the white edges is intuitive and quite easy because there are not so many solved pieces you have to pay attention to. In most cases you just simply rotate the piece where it is supposed to be.
Here are a few examples which require a few extra moves.
F R' D' R F2 F' R' D' R F2 R' D' R F2
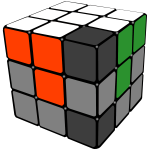
2. SOLVING THE WHITE CORNERS
Now that the white edges are solved we have to fix the white corners to complete the first face.Our cube should look like this when we complete this step.
If you have difficulties solving the white corners, here's an easy trick you can always apply, you just have to memorize a short algorithm and repeat it until the piece is solved:
R' D' R D
trick always works but requires too many unnecessary steps. Here are the shorter algorithms:
F D F' R' D2 R D R' D' R
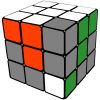
3. MIDDLE LAYER
Now that we've finished the white face, let's turn the cube upside down because we don't need to see the solved side anymore.
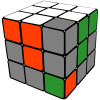
The solution was easy and intuitive until this point but this is where most people get stuck because the algorithm used to solve the second layer needs too many steps to foresee.
We have to learn two algorithms which are symmetric to each other. The right algorithm sends the edge piece from the Front-Up position to Front-Right while the left algorithm sends the piece to the Front-Left.
RIGHT LEFT
U R U' R' U' F' U F U' L' U L U F U' F'
When there's no edge piece to insert into the middle layer you will have to execute the algorithm twice to pop the piece out in the first step.
U R U' R' U' F' U F - U2 - U R U' R' U' F' U F
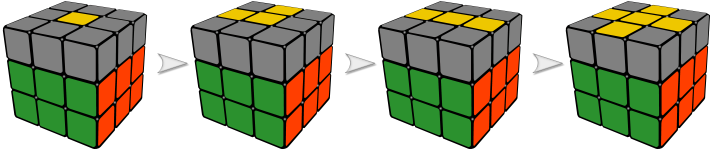
4. TOP CROSS
In the fourth step we want to form a yellow cross on the top of the cube. Don't worry if the side colors don't match the side center colors because we will send the pieces to their final positions in the next step.In this step, when all other edge pieces are solved, except the yellow ones you can have these patterns on the top of your cube. Use the algorithm to transform to the next state until you reach the cross.
F R U R' U' F'
5. SWAP LAST LAYER EDGES
We have the cross on the top but the sides of the yellow edges don't match the side colors yet. We need to put them in their final destinations.To sort this out we use an algorithm which swaps the Front-Up and the Left-Up adjacent edges.
R U R' U R U2 R' U
In some cases two opposite pieces have to be swapped which needs to be done in two steps.
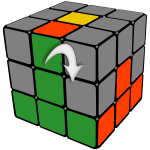
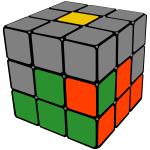
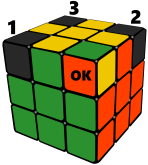
6. POSITION LAST LAYER CORNERS
We have almost finished solving our Rubik's Cube. Only the yellow corners remained which we are going to sort out in two steps. First we have to position them and will orient them in the next step.
U R U' L' U R' U' L
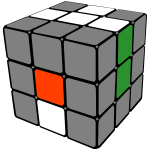
This algorithm cycles the corners marked with the numbers on the image above, while the Front-Right-Up corner, marked with "OK" stays in place.
When you reach this point in the solution look for a corner piece which is in the right place. If you can find one then reorient the cube in your hands so this is on the OK position and perform the formula. In some cases you have to apply it twice.
If none of the yellow corners are on the right spot then do the algorithm to reorganize them and then look again because there must be one this time.
An interesting fact is that in this step the number of pieces in the right spot can only be 0, 1 or 4.
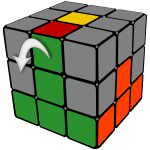
7. ORIENT LAST LAYER CORNERS
In the last step every piece is where it's supposed to be, but the yellow corners are oriented wrong. To complete our cube we will use the same algorithm we used to solve the first layer corners:
R' D' R D
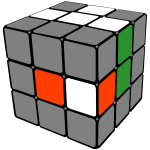
Start by holding the cube in your hand having a misaligned yellow corner in the highlighted Front-Right-Up spot(see image). Repeat the R' D' R D algorithm until this one piece is on its place with the yellow sticker up.
Turning only the Up face, move another wrong yellow corner to the highlighted spot and repeat the R' D' R D algorithm until this yellow piece is solved.
here is an example :-
SHARE THIS AMONG YOUR FRIENDS !


![Solve Rubik's Cube 3x3 bigginer method [easy]](https://blogger.googleusercontent.com/img/proxy/AVvXsEiQR3yswmS5tMV7oV1Zfv4XHfDZe9trdEaf0mB5L4ikO8y4qybJTSjsGNUiUrBcjUbVly4ZRqIUTrhjM5K4mRcuCaOKnRsOxHGQAjci3z3TP5ho_o2viGrJaOU1wDffh9QSOQecEuIFCanMQGjLwuhdVvrQNC2aqrjwWJF2_ujAPw=s72-c-d)

Leave a Comment